
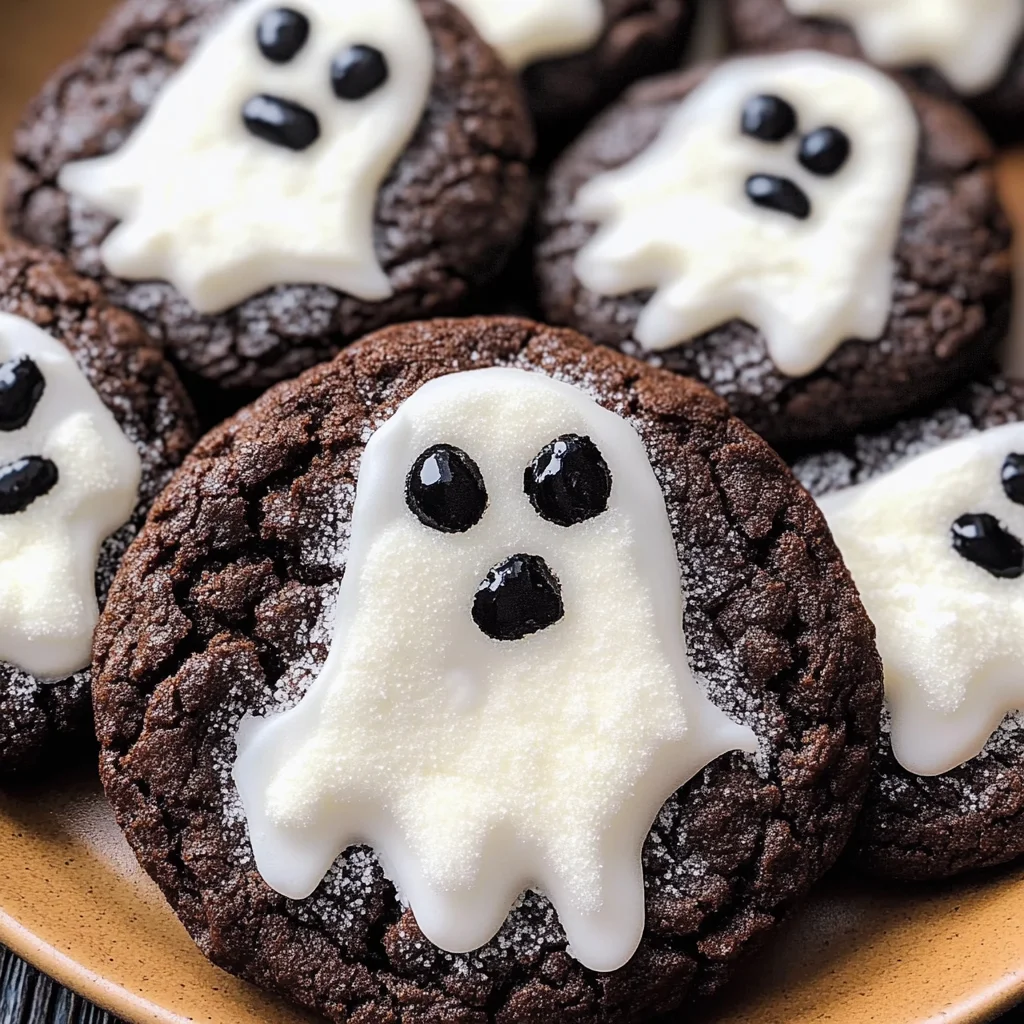
Take your Halloween festivities to the next level with these delightful Ghost cookies. This easy-to-make treat is perfect for parties, gatherings, or a fun afternoon activity with kids. With just a few simple ingredients, you can create spooky snacks that are both cute and delicious. These Ghost cookies are sure to impress and add a festive touch to any occasion!
Why You’ll Love This Recipe
- Simple Preparation: With only a few ingredients and no baking required, these cookies come together quickly.
- Kid-Friendly Fun: Decorating these spooky treats is a great activity for children, making it perfect for family bonding.
- Versatile Design: Customize the ghost faces to match your style—create happy ghosts or spooky ones!
- Perfect for Any Occasion: Whether it’s Halloween or just a fun gathering, these Ghost cookies fit right in.
- Delicious Flavor: The combination of chocolate chunk cookies and sweet icing makes for an irresistible treat.
Tools and Preparation
Before diving into the recipe, gather your tools to ensure a smooth baking process. Having everything ready will make decorating your Ghost cookies even more enjoyable.
Essential Tools and Equipment
- Mixing bowl
- Spatula
- Baking tray
- Parchment paper
Importance of Each Tool
- Mixing bowl: Necessary for combining ingredients easily without making a mess.
- Spatula: Helps in spreading icing evenly on the cookies for a smooth finish.
- Baking tray: Provides the perfect surface to lay out your decorated cookies.
- Parchment paper: Prevents sticking and makes cleanup effortless.
Ingredients
Create these spooky Ghost cookies with simple ingredients:
For the Cookies
- 200g pack chocolate chunk cookies
For the Icing
- 175g icing sugar
For the Ghost Topping
- 9 vegan marshmallows (regular size)
- Black writing icing
How to Make Ghost cookies
Step 1: Prepare Your Cookies
Start by laying out your chocolate chunk cookies on a baking tray lined with parchment paper. This will keep them from sticking and make them easier to decorate later.
Step 2: Make the Icing
In a mixing bowl, combine the icing sugar with a small amount of water (just enough to create a thick consistency). Stir until smooth.
Step 3: Decorate with Icing
Using your spatula, spread the icing over each cookie. Aim for an even coating that covers most of the cookie surface.
Step 4: Add the Marshmallows
Place a vegan marshmallow on top of each iced cookie. Gently press down so they stick well.
Step 5: Create Ghost Faces
Using black writing icing, draw ghostly eyes and mouths on each marshmallow. Be creative—make them as spooky or silly as you like!
Step 6: Let Them Set
Allow the decorated Ghost cookies to sit for about 10-15 minutes so that the icing can set properly before serving. Enjoy your Halloween treats!
How to Serve Ghost cookies
Ghost cookies are a fun and spooky treat perfect for Halloween gatherings, parties, or just a creative baking session with family. Here are some delightful serving suggestions to elevate your ghostly creations!
Creative Platter Ideas
- Spooky Cookie Tower: Stack the ghost cookies on a decorative cake stand for an impressive display that will catch everyone’s eye.
- Ghostly Dessert Table: Arrange the cookies alongside other Halloween-themed treats for a festive dessert table.
- Individual Treat Bags: Place each cookie in small clear bags tied with black ribbons for easy grab-and-go treats.
Pairing with Beverages
- Hot Chocolate: The rich flavor of hot chocolate complements the sweetness of ghost cookies perfectly.
- Pumpkin Spice Latte: A seasonal favorite that enhances the Halloween vibe while balancing the sweetness of the cookies.
Themed Decorations
- Spider Web Accents: Use black lace or edible spider web candy to decorate your serving area, adding to the spooky theme.
- Mini Ghost Figurines: Place small ghost figurines around your cookie display for extra flair and fun.
How to Perfect Ghost cookies
To make sure your ghost cookies turn out perfectly every time, follow these helpful tips.
- Bold Icing Technique: Use a piping bag for precise icing application to create clean outlines and details on your ghosts.
- Temperature Control: Ensure your cookies are completely cooled before decorating to prevent melting of the icing.
- Use Fresh Ingredients: Always use fresh marshmallows and icing sugar for the best taste and texture in your ghost cookies.
- Experiment with Colors: While black writing icing is traditional, consider adding colored icing for a vibrant twist.
Best Side Dishes for Ghost cookies
Serving ghost cookies can be even more fun when paired with side dishes that complement their flavor. Here are some great options!
- Pumpkin Soup: A creamy pumpkin soup adds warmth and seasonal flavor that pairs beautifully with sweet treats.
- Apple Slices with Caramel Dip: Tart apple slices dipped in sweet caramel offer a delightful contrast to the sugary cookies.
- Cheese Platter: An assortment of cheeses can balance out the sweetness of the ghost cookies and provide savory notes.
- Veggie Sticks with Hummus: Crisp veggies served with hummus offer a healthy option that contrasts well with dessert.
- Chocolate-Covered Pretzels: These salty-sweet snacks add another layer of flavor and texture to your Halloween spread.
- Fruit Salad: A refreshing fruit salad provides a light option that brightens up the table while complementing the sweetness of the cookies.
Common Mistakes to Avoid
When making ghost cookies, it’s easy to overlook some details that can affect the final result. Here are common mistakes to avoid for perfect spooky treats.
- Ignoring the icing consistency – If your icing is too runny or thick, it can ruin the ghostly appearance. Adjust with water or icing sugar until you achieve a smooth yet piping consistency.
- Overbaking cookies – Baking cookies for too long will make them hard instead of soft and chewy. Keep an eye on them and take them out when they are lightly golden.
- Skipping the chilling time – Not allowing the cookies to cool before decorating can lead to melty marshmallows. Let them cool completely to ensure your ghosts look great.
- Using stale ingredients – Old baking supplies can affect flavor and texture. Always check expiration dates on your ingredients, especially the icing sugar and marshmallows.
- Neglecting decoration details – A rushed decorating process can lead to less appealing ghost cookies. Take your time with the black writing icing for a more polished look.

Storage & Reheating Instructions
Refrigerator Storage
- Store ghost cookies in an airtight container.
- They will stay fresh for up to 5 days in the fridge.
Freezing Ghost cookies
- Place ghost cookies in a single layer on a baking sheet to freeze first.
- After freezing, transfer them to a freezer-safe container or bag for up to 3 months.
Reheating Ghost cookies
- Oven – Preheat to 350°F (175°C) and warm cookies for about 5-7 minutes.
- Microwave – Heat individual cookies for about 10-15 seconds; watch closely to avoid melting too much.
- Stovetop – Use a skillet on low heat, covering with a lid for about 2-3 minutes.
Frequently Asked Questions
Here are some common questions people have about making ghost cookies.
What are ghost cookies?
Ghost cookies are festive treats decorated like ghosts using marshmallows and icing, perfect for Halloween celebrations.
Can I customize ghost cookies?
Yes! You can add different colored icing, use various cookie shapes, or even fill them with chocolate chips or other candies.
How do I store leftover ghost cookies?
Store leftovers in an airtight container at room temperature for up to five days or freeze them for longer storage.
Are there alternatives to vegan marshmallows?
You could use fruit-flavored gummy candies shaped like ghosts if you prefer not using marshmallows.
Can I make these ghost cookies gluten-free?
Absolutely! Substitute regular chocolate chunk cookies with gluten-free options available at most grocery stores.
Final Thoughts
Ghost cookies are not just delightful treats; they provide endless opportunities for creativity and fun during Halloween. Feel free to customize decorations or flavors based on personal preferences. We encourage you to try this simple recipe with friends and family!

Ghost Cookies
- Total Time: 15 minutes
- Yield: Approximately 9 servings 1x
Description
Elevate your Halloween celebrations with these delightful Ghost Cookies that are as fun to make as they are to eat. These no-bake treats feature chocolate chunk cookies topped with fluffy vegan marshmallows, creating a spooky yet adorable dessert perfect for parties, gatherings, or a memorable afternoon activity with kids. With only a few simple ingredients and easy steps, you can unleash your creativity by decorating each ghost cookie to match your style—whether whimsical or eerie. Ideal for any festive occasion, these ghostly delights are not only visually appealing but also irresistibly delicious thanks to the sweet icing and chocolatey base. Get ready to impress your guests and make lasting memories with this creative baking project!
Ingredients
- 200g chocolate chunk cookies
- 175g icing sugar
- 9 vegan marshmallows (regular size)
- Black writing icing
Instructions
- Place the chocolate chunk cookies on a parchment-lined baking tray.
- In a mixing bowl, combine icing sugar with enough water to achieve a thick consistency. Stir until smooth.
- Spread the icing over each cookie using a spatula for an even layer.
- Top each iced cookie with a vegan marshmallow, pressing gently to secure.
- Use black writing icing to draw ghostly faces on each marshmallow—let your imagination run wild!
- Allow the cookies to sit for 10-15 minutes so the icing can set before serving.
- Prep Time: 15 minutes
- Cook Time: 0 minutes
- Category: Dessert
- Method: No-bake
- Cuisine: American
Nutrition
- Serving Size: 1 serving
- Calories: 210
- Sugar: 18g
- Sodium: 50mg
- Fat: 8g
- Saturated Fat: 3g
- Unsaturated Fat: 5g
- Trans Fat: 0g
- Carbohydrates: 33g
- Fiber: 1g
- Protein: 2g
- Cholesterol: 0mg