
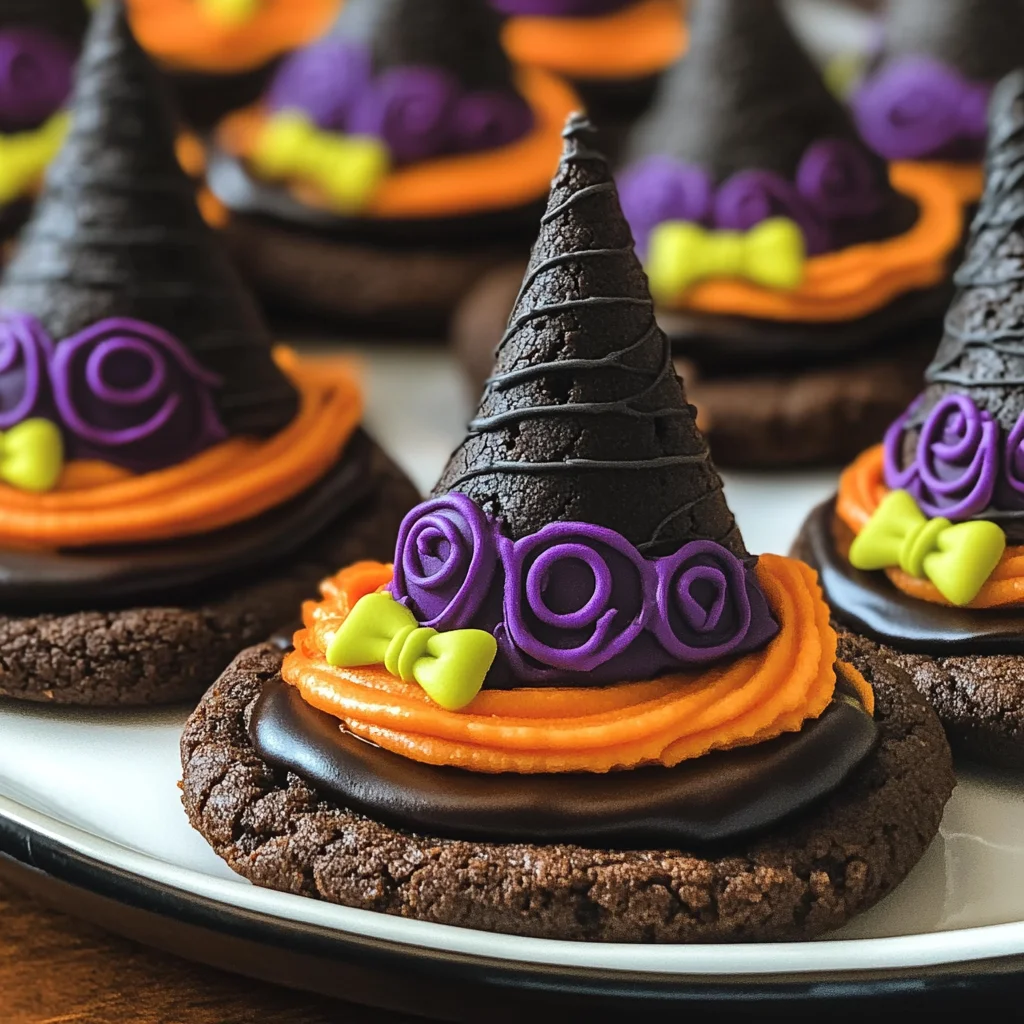
These Halloween Witch Hat Cookies are a delightful treat that brings a spooky twist to your dessert table. Perfect for Halloween parties or festive gatherings, these cookies are not only fun to make but also allow for endless customization. With chocolatey flavors and colorful decorations, they’re sure to enchant all your guests, young and old alike.
Why You’ll Love This Recipe
- Fun Family Activity: Creating these witch hat cookies is a great way to bond with kids as you decorate and customize each treat together.
- Easy to Customize: The decorating options are limitless! Use different colors and designs to match your Halloween theme.
- Deliciously Chocolatey: The combination of chocolate cookies and cake mix creates a rich flavor that everyone will love.
- Perfect for Any Occasion: While ideal for Halloween, these cookies can be enjoyed at any festive gathering.
- Eye-Catching Presentation: Their unique shape and vibrant colors make them an impressive centerpiece on any dessert table.
Tools and Preparation
To make these Halloween Witch Hat Cookies, you’ll need a few essential tools. Having the right equipment makes the process smoother and more enjoyable.
Essential Tools and Equipment
- Cookie sheet
- Cupcake Cones Baking Rack
- Parchment paper
- Decorating bags
- Spatula
Importance of Each Tool
- Cookie sheet: A sturdy cookie sheet helps ensure even baking of the cones without bending or warping.
- Cupcake Cones Baking Rack: This rack holds the sugar cones securely in place while they bake, preventing spills and messes.
- Parchment paper: Using parchment paper makes cleanup easier and prevents sticking when spraying the cones.
- Decorating bags: These bags help control icing application for precise decoration on your witch hats.
Ingredients
For the Cake Mix Base
- Favorite Cake Mix or Try Wilton’s Chocolate Cake Recipe
For the Cookies
- Store Bought Chocolate Cookies or Try This Recipe from Wilton
For Icing Colors
- Lemon Yellow Icing Color
- Black Color Mist Food Coloring Spray
- Rose Icing Colors Pink Food Coloring
- Violet Icing Color, Gel Food Coloring
- Golden Yellow Icing Color
- Orange Icing Color
For Decoration
- Sugar Cones
- Creamy White Decorator Icing, 4 lb. Tub
How to Make Halloween Witch Hat Cookies
Step 1: Prepare & Bake the Cones
- Prepare the cake mix according to your chosen recipe instructions.
- Place the Cupcake Cones Baking Rack on the cookie sheet.
- Insert sugar cones into the rack and fill each cone with 2 tablespoons of cake batter.
- Bake according to your recipe’s timing instructions, then allow them to cool.
Step 2: Spray the Cones
- If needed, trim the risen cake at the top of each cone using a knife.
- Place cones wide side down on parchment paper.
- Spray black using Black Color Mist, ensuring even coverage.
- Allow them to dry for about 10 to 15 minutes.
Step 3: Tint the Icing & Prepare the Bags
- Tint 1 cup of creamy white decorator icing orange.
- Tint another cup purple by mixing violet and rose icing colors.
- Prepare two decorating bags fitted with tip 2B; fill one with orange icing and another with purple icing.
- Additionally, tint ¼ cup of creamy white decorator icing yellow by combining golden yellow and lemon yellow colors, placing it in a bag with tip 3 attached.
Step 4: Assemble the Witch Hats
- Pipe a small amount of orange icing in the center of a cookie; place a cone on top.
- With smooth side facing out, pipe a band around half of the cones using orange icing; smooth with a spatula.
- Repeat this process with purple icing for the other half of cookies and cones.
- Allow them to set for about 15 to 20 minutes before piping yellow icing around each band as buckles.
- Let everything set again for another 15 to 20 minutes before serving.
Enjoy your spooky treats!
How to Serve Halloween Witch Hat Cookies
These Halloween Witch Hat Cookies are not only fun to make but also a delightful treat for any Halloween gathering. Here are some creative ways to serve them.
At a Halloween Party
- Arrange the cookies on a spooky-themed platter for an eye-catching centerpiece.
- Pair them with themed drinks like pumpkin spice lattes or apple cider for a complete festive experience.
As a Classroom Treat
- Package individual cookies in clear bags tied with orange ribbons for easy sharing among classmates.
- Offer them alongside fun Halloween trivia to engage kids while they enjoy their treats.
For Movie Night
- Set up a snack table with the cookies and other themed snacks like popcorn or candy corn.
- Create a cozy atmosphere with fall-themed decorations and enjoy some classic Halloween movies.
As Halloween Favors
- Send guests home with cookies in decorative boxes as a sweet reminder of the event.
- Personalize each box with guest names or spooky stickers for an extra touch.
How to Perfect Halloween Witch Hat Cookies
Making the perfect Halloween Witch Hat Cookies is all about attention to detail. Keep these tips in mind for best results.
- Use fresh ingredients: Ensure your cake mix and icing are fresh for the best flavor and texture.
- Chill the icing: If your icing is too runny, refrigerate it briefly before decorating to improve its consistency.
- Practice decorating: Test your piping technique on parchment paper before applying it to the cookies.
- Let layers set: Allow each layer of icing and decoration to set properly before adding more to avoid smudging.
- Experiment with colors: Feel free to mix different food coloring shades for unique and vibrant witch hats.
Best Side Dishes for Halloween Witch Hat Cookies
Pairing side dishes with your Halloween Witch Hat Cookies can enhance the festive spirit. Here are some great options:
- Pumpkin Soup: A warm, creamy soup that perfectly complements the sweetness of the cookies. Serve in small cups for easy handling.
- Spooky Cheese Platter: Include assorted cheeses cut into fun shapes along with crackers and grapes for a balanced snack option.
- Caramel Apples: Tart apples coated in rich caramel add a crunchy contrast to your soft cookies, perfect for fall flavors.
- Ghostly Fruit Salad: Mix seasonal fruits like oranges, pears, and grapes, and add ghost-shaped marshmallows on top for a playful twist.
- Vegetable Tray with Dip: Offer fresh veggies like carrots, celery, and bell peppers alongside a creamy dip for health-conscious guests.
- Popcorn Mix: Create a mix using popcorn, candy corn, and nuts; it’s easy to make and adds a nice crunch next to your cookies.
Common Mistakes to Avoid
When making Halloween Witch Hat Cookies, there are a few common mistakes to watch out for. Here are some tips to help you avoid them.
- Using the wrong cake mix: Make sure to select a cake mix that complements your flavor preferences. A chocolate cake mix works best for these cookies.
- Not baking the cones properly: Follow the baking time closely. Undercooking can lead to soggy cones, while overcooking will make them too dry.
- Skipping the cooling step: Allow the cones to cool completely before applying color. This prevents the spray from melting the icing and helps it adhere better.
- Inconsistent icing colors: Ensure you mix your colors well and test a small amount before decorating. Consistent colors make your cookies visually appealing.
- Rushing assembly: Take your time when assembling the witch hats. Let each layer set before proceeding to ensure stability and an appealing look.
Storage & Reheating Instructions
Refrigerator Storage
- Store in an airtight container to maintain freshness.
- Best enjoyed within 3 days for optimal flavor and texture.
Freezing Halloween Witch Hat Cookies
- Place cookies in a single layer in a freezer-safe container.
- They can be frozen for up to 2 months; just ensure they are well-wrapped to prevent freezer burn.
Reheating Halloween Witch Hat Cookies
- Oven: Preheat to 350°F (175°C) and warm cookies for about 5-10 minutes until heated through.
- Microwave: Heat on medium power for 10-15 seconds, checking frequently to prevent overheating.
- Stovetop: Use a skillet over low heat, covering with a lid for a few minutes until warmed.
Frequently Asked Questions
What are Halloween Witch Hat Cookies?
Halloween Witch Hat Cookies are fun, chocolaty treats shaped like witch hats, made using cake mix and decorated with colorful icing.
How do I make Halloween Witch Hat Cookies?
Follow the detailed recipe instructions provided above. Key steps include baking cones, tinting icing, and assembling the cookies.
Can I customize my Halloween Witch Hat Cookies?
Absolutely! You can use different cake flavors or color combinations for icing to match your party theme or personal taste.
How long do Halloween Witch Hat Cookies last?
Stored properly in an airtight container, they will stay fresh in the refrigerator for up to three days.
Are Halloween Witch Hat Cookies easy to make with kids?
Yes! These cookies are a fun project for kids, allowing them to participate in decorating and assembling their spooky treats.
Final Thoughts
These Halloween Witch Hat Cookies are not just delicious but also visually captivating. Their versatility allows you to customize flavors and decorations according to your preference. Give this fun recipe a try at your next Halloween gathering!

Halloween Witch Hat Cookies
- Total Time: 50 minutes
- Yield: Approximately 12 servings
Description
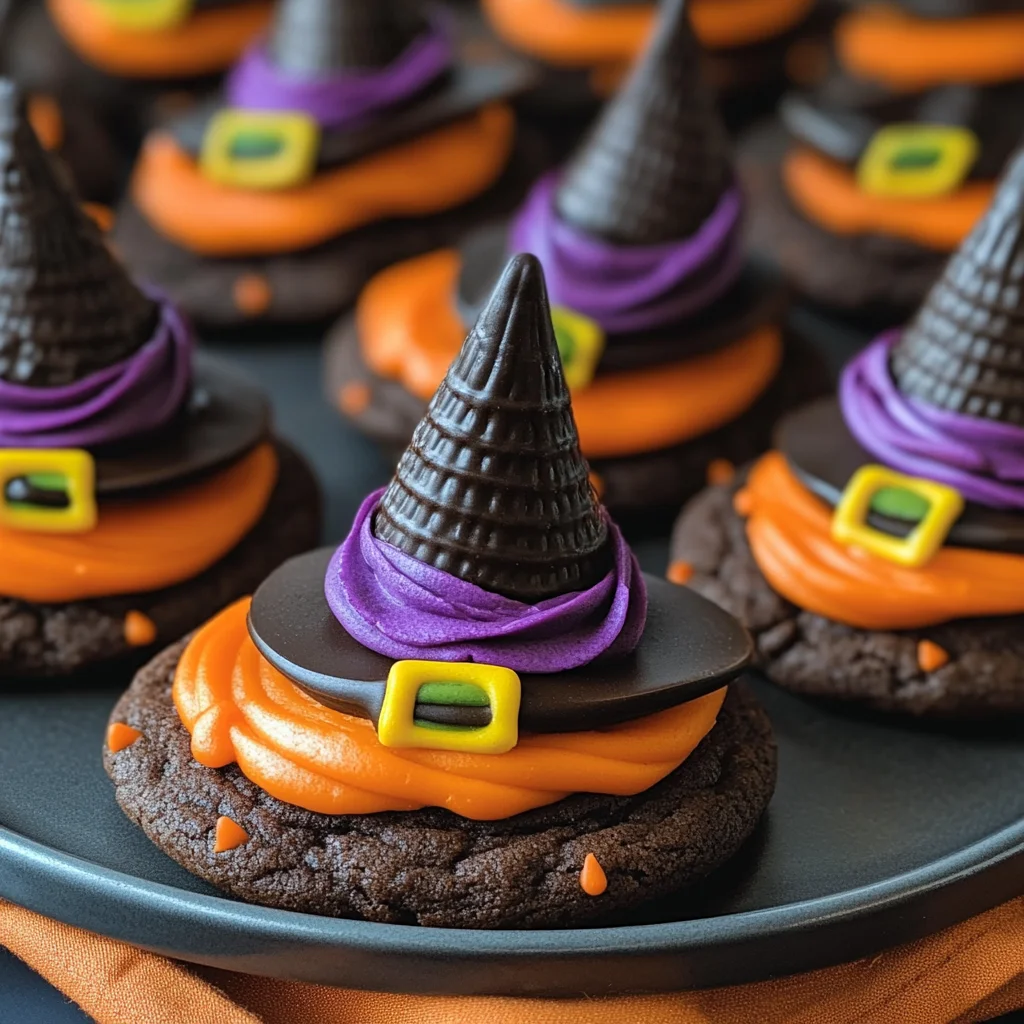
Get ready to cast a spell on your Halloween festivities with these enchanting Halloween Witch Hat Cookies. These delightful treats feature a rich chocolate base and are topped with colorful icing, making them a fun and creative project for the whole family. The unique witch hat shape adds an element of whimsy, while the endless decorating possibilities let you personalize each cookie to match your spooky theme. Perfect for parties, classroom treats, or cozy movie nights, these cookies are sure to impress all ages. Easy to make and even easier to enjoy, they will become a staple for every Halloween gathering!
Ingredients
- Favorite cake mix
- Store-bought chocolate cookies
- Sugar cones
- Creamy white decorator icing
- Assorted food coloring (black, orange, purple, yellow)
Instructions
- Preheat your oven and prepare your cake mix according to package instructions.
- Fill sugar cones with cake batter and bake until done. Let cool completely.
- Spray cooled cones with black color mist and let dry.
- Tint icing in orange, purple, and yellow colors, preparing piping bags accordingly.
- Assemble cookies by adhering cones to the chocolate cookies with icing; decorate with colored icing as desired.
- Allow decorations to set before serving.
- Prep Time: 30 minutes
- Cook Time: 20 minutes
- Category: Dessert
- Method: Baking
- Cuisine: American
Nutrition
- Serving Size: 1 cookie (50g)
- Calories: 210
- Sugar: 15g
- Sodium: 150mg
- Fat: 8g
- Saturated Fat: 4g
- Unsaturated Fat: 3g
- Trans Fat: 0g
- Carbohydrates: 31g
- Fiber: 1g
- Protein: 2g
- Cholesterol: 10mg